[title subtitle=”DIY: State Love Woodworks
Words and Images: courtesy Catherine Frederick”][/title]
Materials
- Piece of wood cut to size (we used precut 24” circle from Lowe’s)
- Paint or stain (we used Minwax® Clear Tint stained red)
- Primer (if using acrylic paint)
- Paintbrush
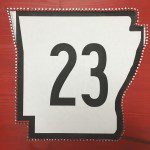
- State of Arkansas printout
- Scissors
- Masking tape
- Small nails (we used 2 boxes of 1 ¼ X 16 wire nails)
- String in color of choice (we used white No. 5 embroidery string)
- Hammer
- Pliers
- Saw tooth hanger (optional)


Method
If wood is not prefinished, sand to ensure smooth surface on all sides. Paint or stain wood. If painting with acrylic paint, be sure to use a primer.
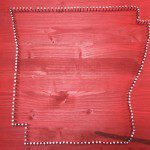
Tape printout to wood with masking tape. Hammer nails about ¼” apart around the entire printout, leaving ¾” of the nail sticking out of the wood. Remove printout. Tape down a heart shape over the area you want to focus on. Hammer nails around heart shape, remove shape. Make sure nails are straight, if not, use pliers to straighten. Using string, tie a knot around one nail in an upper or lower corner of the state outline.
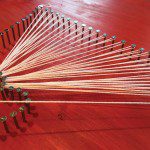
Count the total number of nails around the state and divide by the number of nails around the heart (for every one nail around the state, we wrapped the string around a nail on the heart outline 6-7 times).
Run the string from the first nail on the state outline to the closet nail on the heart outline and then back to the next nail on the state outline, then back to the same nail on the heart. Continue to thread the string back and forth between the state and heart outlines until you reach the original nail on the state outline. Tie another knot and trim any excess string. Tie new piece of string onto a nail, then weave the string in and out of the nails that outline the state. Once back to starting point, weave string in and out of the outline nails a second time, but on the alternate side of the nails, to give a finished, outlined look – it will appear as a zigzag.
Add saw tooth hanger to the back of the wood, if you’ll will be hanging on a wall.